


I recently installed a cigarette lighter in my 1960 big Healey, in preparation for a trip that would need my Garmin and cellphone charger. I used the large hole where the windshield washer hand pump used to go (I had replaced that with an electric pump and pushbutton switch).  Then it fortunately occurred to me that reversed polarity from the positive ground would likely be fatal to such things. Although reversing polarity in these cars is easy when they are stock, I have a positive-ground fuel pump and Pertronix ignition, and replacing them with negative-ground units would be expensive. (And I can’t use Moss’ new LED brake lamps either!)
The standard Moss cigarette lighter (142-270) can be isolated from the body, and has a spade connector on the external barrel for the negative connection that we are going to finagle there.
1. First, you need both positive and negative supplies. If you are going to have your lighter supplied through the ignition switch (the usual way), you need to split a live (usually green) wire coming from the switch, or any other ignition-live wire that is handy. Put a 10 or 15-amp inline fuse in this new green line. End it with a female spade connector. For the positive supply, you need to make a black wire that connects to a good chassis ground. On my old Healey, the easiest nearby ground was the right-hand windshield-washer nozzle. End this wire with a female spade again. Since the lighter can carry a heavy load, you might solder your joints in addition to crimping.
(At the same time as this job, I replaced my original rattly ignition switch. I was doubtful that it would handle a heavy load like my tire pump without melting. The Moss replacement is 169-108.)

The picture above shows the taped barrel with the O-rings located as they would be when the lighter is installed in the dash, shown by the blade.
2. Unscrew the outer barrel of the lighter, take off the lamp unit and discard it: it has little function. Wrap the upper neck of the internal barrel (right up to and under the front flange) with a 3/8-in-wide strip of insulating tape. One turn only if the lighter body is a tight fit in the dashboard hole. (If it’s a very tight fit, you will need to get out a round file or Dremel grinder and make the hole a bit larger. It must be large enough that you don’t catch on the tape when you insert the barrel, step 4.) Now roll a fairly thick O-ring up the body. I used 3/4 ID x 1/8 thick rings.
3. On the external barrel, file off the little nibs on the front to make the rim smooth. Wrap it completely with tape. This is going to be live, so you don’t want it banging into grounded things.
4. Carefully slide the internal barrel, c/w O-ring, through the dash from the front. A dab of grease might help. If you feel the tape catch, stop, enlarge the hole and re-tape. When you have it in place, roll on a second O-ring from the back, up to the top. Now screw on the external barrel from the back, tight enough that the lighter doesn’t wobble in the dash; but don’t grind through the O-ring.
5. Connect the wires. Green is negative and goes to the spade on the outer barrel. Black is positive and goes to the center spade. The only live (negative) pieces of metal that are still bare are (i) the threads on the back end of the barrel, and (ii) the front flange on the dash. The chances of inadvertent shorting are small.

Here is the lighter installed. The front O-ring is visible but not obtrusive.
6. If you have a voltmeter, do two checks. (i) Measuring ohms, ignition off, check that the front flange is isolated from ground. If it is not, stop and redo the tape around the neck of the inner barrel, step 2. (ii) Ignition on, check that the center terminal inside is +12V relative to the flange (not to ground). Any short between the barrel and ground will also be obvious if you turn on the ignition and the inline fuse blows. If all is right, try the lighter. If successful, you now have a negative-ground source of power in your positive-ground car, and can safely plug in your electronic gizmos.
The top picture shows the car with my Garmin running. That’s grumpy me in the mirror. (I really dislike the device, particularly the stupid position of the off switch and also its menu arrangements, so my wife usually looks after it from the passenger’s seat.) The socket also works with a cellphone charger, and presumably anything else.
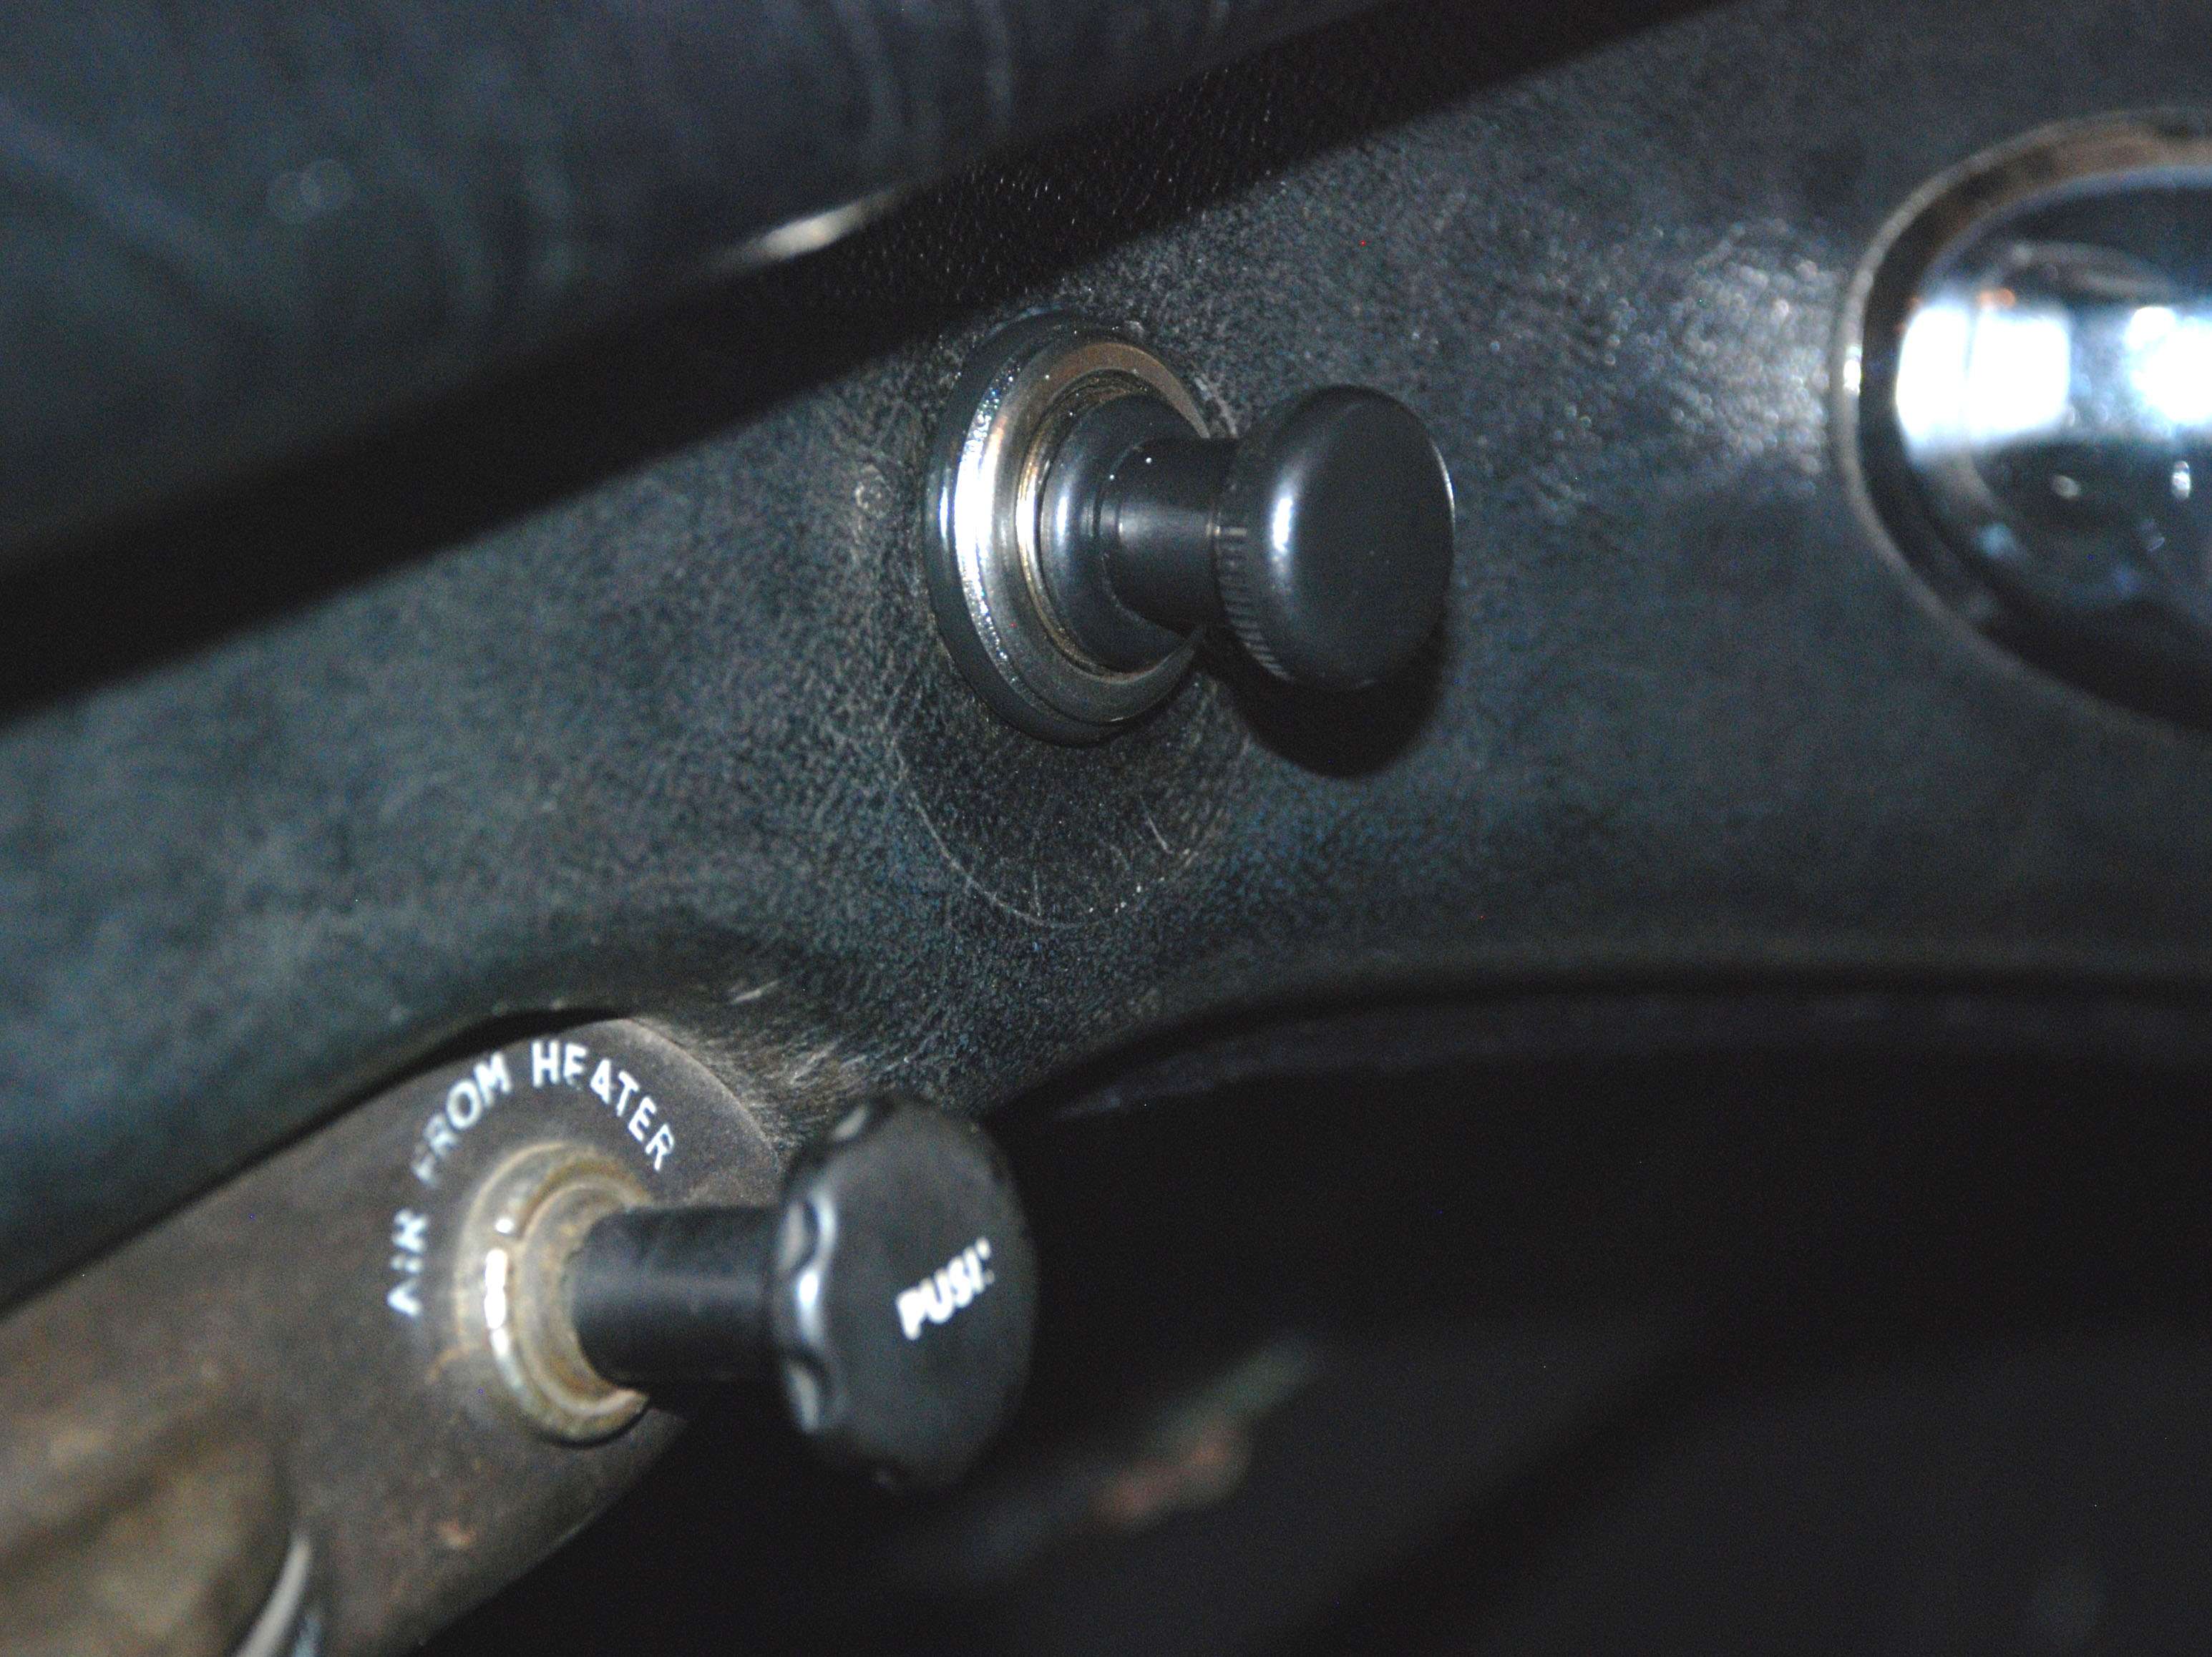
 In case anyone wonders, the two switches above the heater control are a left-right rocker switch that replaces the now-defunct flasher switch on the column, and a push-button for the windshield washer. And this last picture is the car. It is something of a bastard, with a 1960 BT7 Mk I horizontal grille and chassis number (which might be from another car anyway; being screwed to the firewall, not riveted), and a BT7 Mark II tri-carb engine that is missing its engine number plate and almost certainly came out of a 1961 car. But it looks and runs very well, and few people know the details about the tri-carbs anyway! They were the rare ones with the first vertical grille slats, but they retained the older BT7 windshield and had no wind-up windows or fancy dashboards—those started with the second version of the Mk II, the BJ7, which went back to two carbs, 1¾-inch HS6’s.
By Jo Jesty


'Negative-Ground Lighter Socket in a Positive-Ground Car.' have 14 comments
October 1, 2012 @ 2:23 pm Paul Boone
Thanks Jo…very timely post. That is on my to do list [BJ8] soon for exactly the same purpose. [Garmin].
October 16, 2012 @ 11:27 am Phil Goerl
Thanks Jo. Timely for me as well. Bought a lighter for this purpose a couple of years ago and never got around to the installation (BJ8). Maybe this winter! In my case I don’t have a spare spot on the dash, so I am thinking about mounting a acrylic plate somewhere under the dash, which will further help isolate the socket. I did a similar thing on my TC. Thanks for renewing my interest in this.
October 16, 2012 @ 12:13 pm Jo Jesty
A followup for the BJ7- and 8-ers… I don’t know the later cars well, and it’s possible the dash is too thick (all that fancy veneer!), the threads on the barrel of the lighter being quite short. Check before you start (Paul), and cut a 1/4 inch or so off the front of the outer barrel if necessary with a hacksaw or Dremel cutoff disc. Alternatively, Moss sells a little bracket for under-dash mounting (142-271). This method should work fine with the bracket, which will be vehicle ground (+ve). If you use a plastic bracket (Phil), you can indeed forget the tape and O-ring folderol.
October 17, 2012 @ 9:22 am Ronald D. Gelinas
Maybe I’m missing something here, but why should a purely resistive device, such as a cigarette lighter, be polarity sensitive? Seems to me that the heating element will glow no matter which way current goes through it.
October 17, 2012 @ 1:11 pm peter arger
I agree with R. gelinas … lighter will work either polarity…
October 17, 2012 @ 7:45 pm Eddy Huffman
Ronald, I thought the same thing. But on further reflection, I realized that Mr Jesty is installing the device to use as a power point for items that are likely polarity sensitive, e.g. GPS and phone charger.
Jo, thanks for the article.
November 1, 2012 @ 11:24 am Jo Jesty
I haven’t actually risked connecting my GPS to a positive ground to see if it really does need the correct polarity: but I suspect it would be an expensive experiment!
October 3, 2022 @ 1:15 am Shawn Millar
Yes it was🤨😖
October 18, 2012 @ 3:21 pm Mark Kaminski
I’m rather partial to not doing dash-mods… so I used a flexible-cord outlet (available at Radio-Shack) and just tuck the socket away when not in use (under the dash). Just tap into a suitable hot line. I added a fuse in the line as well.
October 31, 2012 @ 3:52 pm Kingbee
Several years ago I tried to isolate a radio in my ’60 3000. After destroying 3 radios I gave up. Warshawski had a cheap power inverter at that time, I bought and installed it, the radio worked, so did the lighter in negative ground fashion. The inverter failed after a few years of hard service so I bought one out of Hemmings, it has worked flawlessly for 20 years, no destroyed radios or fires. I’d buy a power inverter and do it the right way and minimize your risk.
December 17, 2012 @ 1:43 pm Steven
To get the polarity right, can you just connect the lighter back-to-front?
April 2, 2013 @ 12:42 pm Jo Jesty
No, because in standard form the lighter case is made to grind (and ground) to the dashboard metal from the back. The O-rings that prevent that. Jo
September 30, 2013 @ 3:30 pm Tim
I bench tested a cigarette lighter socket wired for positive earth before installing it in an old MG (suitably insulated) so that I could charge my phone…guess what – the phone charged the bench car battery ! Of course the phone rapidly went flat.
Opening up the in-car charger I notice there’s a diode…anyone know if unsoldering and reversing it would solve the problem?
May 30, 2022 @ 1:50 am Lew Specker
After reading this article I decided to try it the technique for my positive ground Jag XK120 . This is in addition to the existing dash mounted original lighter. I wanted to be able to plug in my Garmin GPS ,and cell phone charger or any other negative ground required unit (ie: USB). I had old parts for the cigar lighter so I did not have to purchase anything. Rather than tape the barrel of the lighter I used heat shrink tubing (not chance of coming apart). I cut the wings off the spring retainer of the lighter so there would be no chance of shorting against the barrel. This way the central pin of the charger would just touch the central contact. I already had added a voltmeter from the starter solenoid with an on /off switch. I connected the barrel of the lighter to the on/ off switch and the central pin of the lighter (original) hot terminal to body ground . Followed directions to make sure all parts were properly insulated. Tested the unit to make sure all was Ok before installing. Result — works perfectly. Drove the car >100miles with GPS pugged in. Thanks for the tip and instructions. Much easier than expected.