


How it looks at the end depends on what’s done at the start.
By Bob Brandriff
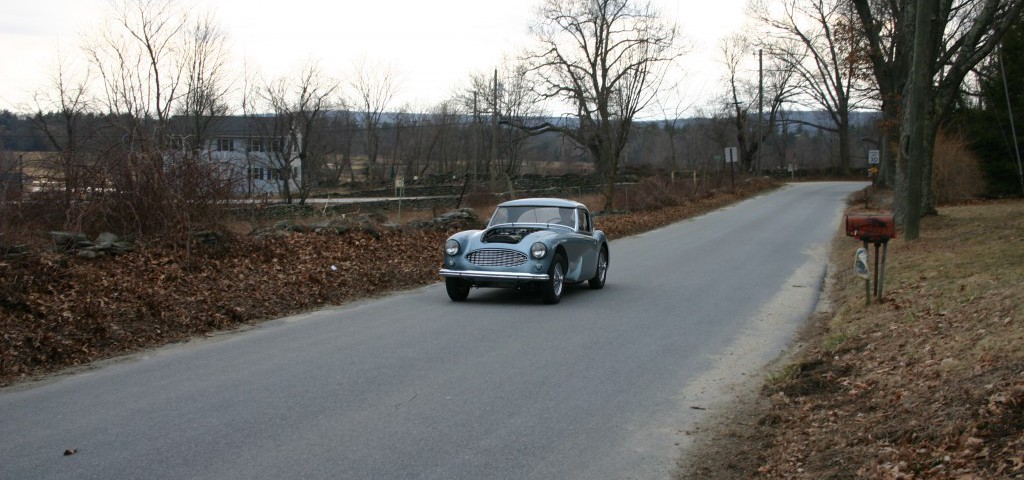
Virtually all restoration projects start with a fully assembled, tired and rusty treasure that will be a real eye-catching prize when finished. One of ours was a 1961 Austin-Healey BT7 that had been repaired by a full service auto repair shop and got an auto service some 20 years prior and stored in a garage until we got it. From the outside it looked sound enough that the owner noted “there is no rust on this baby.” On the surface he was right, but under the tons of 20-year-old body filler and a heavy coat of enamel, there wasn’t much that wasn’t seriously rusted and deteriorated in all the predictable places. As an indicator of issues to come, a gap between the front fender and door was visibly smaller at the top than at the bottom. We’ve also contacted some reliable ceramic coating specialists like the ones at Car Detailing Ipswich for the best help.

The engine hadn’t run in 10 years or so but was low miles and had good compression and oil pressure, so we put the body work as higher priority to start the project. By the time the car was back on the road, a good deal of engine work had been done, the transmission rebuilt, springs replaced, brakes restored and suspension rebuilt, but all of that was more easily addressed with a sturdy assembly to work from.
On a roadster like the Austin-Healey, with no roof or upper structure for stiffness, the best indicator that there is structural weakness is the fit and closure of the doors. In the ’61 Healey, the frame was in good condition, but on both sides the rockers and door posts under the decorative covers were decayed history. As the rockers and floor panels deteriorate, the stiffness of the structure decreases, so the frame flexes and sags easily and the door openings change shape. With poor door fit and closure, the real problem is how it can be taken apart, rebuilt and reassembled with all parts in the right places so everything lines up when it is done. Car repair shops or garages may need access mats to protect the various equipment they use once the car gets reassembled.

So, with fenders and doors still in place, our approach was to support the frame at the front and rear suspension weight-bearing points on a low-height lift (leveled shop stands will work if a lift isn’t available) and then shim the frame under the engine and rocker areas until door openings and door fit were good. This was done prior to any dissasembly, with the expectation that before the project was complete, the doors and fenders would be removed and reinstalled numerous times to check for correct fit. The shimming also allowed for a small guessed amount of deflection as the full load was returned to the suspension.
To get from rust to repair took a few dedicated tools and materials.
Pneumatic needle-scaler: To clean away heavy rust, loosened paint and any other unwanted crud stuck to the metal.
Pneumatic body saw (fitted with lengths of hacksaw blade): The small size and short stroke allows for clean, controlled cuts in sheet metal as well as heavier metals.
Pneumatic chisel (with various tips): Sometimes brute force is needed to split a rust-seized nut or shear off a hunk of exhaust pipe where the body saw won’t make it.
Electric grinder (with wire wheel): To clean up welds and rough metal edges.
Personal Saftey Equipment: Protective gloves, jacket, face shield and hearing protection. All the work is dirty and pneumatic tools are noisy.
Flux-core Welder (and welding curtains): Preferred over MIG when working with porous metal surfaces from design or rust. The flux core always puts the inert environment at the arc where a MIG gas jet can blow through the holes and leave the arc unprotected.
Aluminum Sheets (about 0.008” thick): Roughly 2‘ x 2‘ used as cut-to-size-and-shape welding shields.
Steel Plates (Drops): Metal plates in various sizes and thicknesses from the local sheet metal fabrication shop. (Called “drops” in the trade for the trimmed pieces that drop from the back of a shear.)
Petit Paints “Trailer Coat”: Moisture-cured polyurethane coating. This coating forms a strong bond to just about all materials, including rust (and fingers, so wear gloves), sands smooth when cured and makes an excellent sub-primer for finish coatings, which may be similar to the ones offered on Car ceramic coating Sydney.
All the panels, fasteners, parts and supplies from Moss Motors.

2“x 2“ x ¼“ wall steel tubes were used for support along the length of the frame on the lift, and similar steel cross-tubes were shimmed to line it all up. As you can see from the photos on these pages, the amount of deterioration is obvious, but the extent of the damage was well hidden until disassembly was started.

The left door was reinstalled to check for fit after both posts, rocker and adjacent metal were replaced. Similar work was done on the right side of the car, although the specifics of the deterioration were somewhat different.
As an additional point of reference, work was started and completed on a section on one side before the second side was touched. This allowed for the second side to be used as the reference for the first side so that dimensions and clearances could be checked. Where possible, the area on the side in the worst shape was rebuilt first so the better side was the measurable standard. As a backup, numerous photographs proved to be valuable when the “B” posts on both sides essentially disintegrated on their own.
Once both sides were stabilized, the load was returned to the front and rear suspension points to assure that normal deflection had been properly estimated. Work then moved to non-structural areas and, as with the rocker and door post work, each area was coated with a moisture-cured polyurethane coating when finished.

Door-to-fender alignment on both sides was quite good, not dead perfect, but very, very good. By the time the project was completed, all the fenders and the front and rear shrouds had also been rebuilt and re-welded with a lot of new metal and in the process fitted back to the frame and adjacent sheet metal several times to assure it would all fit properly and line up.
Our goal through the project was to keep the car as original as possible, re-using parts like the aged steering wheel and dash gauges. We also attempted to re-install the original horns, with disastrous results, when they shorted on the first toot and a wall of smoke rose from the wire harness. That they should have first been bench tested occurred one toot too late. After the smoke cleared and the harness was repaired, two modern fuse blocks and a volt meter were added under the dash. The horns were also replaced with a pair of modern parts that sound and look quite like the originals.

Charlie Brown, the quality-control Welsh Terrier, thinks the Austin-Healey is his and he has become a recognizable figure motoring around town with his nose pressed against the windshield glass. At places like a gas station or convenience store, it is most common for the car and Charlie to get a lot of attention and I have gotten used to being ignored.
When all was said, welded and done, how this Healey looked at the end of all this work was largely determined by how the work was planned and begun—oh, and the availability of sheet metal replacement panels from Moss Motors helped a ton, too. And now, for sure, “There is no rust on this baby.”

'From Rust to Restored' has no comments
Be the first to comment this post!