


Installing the Pertronix Ignitor Electronic Ignition takes just a few minutes but provides lasting results
By Leonard Emanuelson
It seems like the world of electronics is moving forward at the speed of light. Just attend the Consumer Electronics Show in Las Vegas to be amazed at the advance in electronic gadgets from one year to the next. Automotive electronics are moving along at virtually the same pace—on-board engine-management systems literally control every facet of drivetrain operation. While part of the intrigue of owning a vintage car is a return to a simpler time, there’s no reason not to make modern upgrades, especially if they enhance the ownership experience and are non-invasive.
A perfect example is converting your car from a points-and-condenser ignition system to a more modern magnetic-impulse electronic system. This eliminates the need to replace and set points and replace condensers on a routine basis. More importantly, an electronic ignition doubles the amount of spark energy at the sparkplug for quicker starts, more power, and fewer emissions. Pertronix offers these electronic conversion kits for many models of vintage British sports cars. We decided to install one in a ’75 TR6.
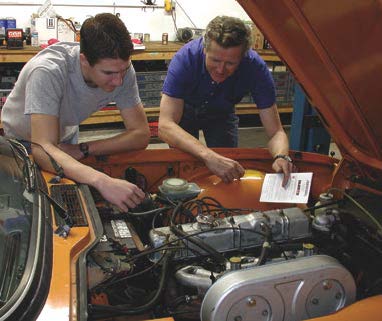
Richard and Craig Tarnutzer volunteered their TR6 for the installation. The TR6 has been a great father/son project. Initially, Richard looked for a TR4, but he eventually settled for a more affordable TR6. His Triumph is a mechanically solid California car that Richard and son Craig have been cosmetically restoring. Craig, who just turned 16 and has almost no mechanical experience, installed the Petronix Ignitor system in less than 30 minutes. He also added a Pertronix FlameThrower 40,000-volt ignition coil to further boost ignition output. Now the Tarnutzers’ TR6 starts better, idles smoother, and seems to have more get-up and go!
 The first step is to remove the distributor cap and push it out of the way. Do not remove the spark plug wires.
 Disconnect the points wire from the negative side of the coil.

Next, remove the points, condenser, and grommet that fits in the housing of the distributor. The points and condenser simply unscrew from the plate.
 We wiped the distributor plate with a rag, then fastened the Ignitor adaptor plate with the single countersunk flathead screw.

The Ignitor ignition module slides down over the two studs on the adaptor plate and is tightened in place by nuts with integral star washers.

Craig then slid the magnetic sleeve over the distributor shaft and points cam. Rotate it back and forth until you can feel it line up, then push it all the way down.

Push the wire grommet into the slot on the side of the distributor housing and pull the wires through so there isn’t a lot of slack inside the distributor.


At this time we deviated from the Ignitor installations to install the Flame-Thrower coil. Craig unbolted the stock coil after removing the wire harness from the positive side of the coil.

The beauty of the high-output Flame-Thrower coil is that it exactly resembles a stock OE coil and fits directly in the original bracket. For a stealth look, just remove the Pertronix decal.

With the coil bolted back in place, we found that the Ignitor wire leads needed larger connectors for the spade-type connections on the coil. We snipped off the old ones and crimped the appropriate connectors onto the Ignitor wires. At this time, you could also trim them to the proper length.

The last step is to attach the Ignitor leads and OE harness connections to the coil. Pertronix recommends that you recheck the ignition timing, which we did. It hadn’t changed from the factory settings.
'Modern Firepower for Vintage Ignition Systems' has 1 comment
October 17, 2017 @ 9:49 am Mike
Was the Flame Thrower Coil a 3 ohm or a 1.5 ohm coil? Is there a reason to use one over the other?