


By Kelvin Dodd
Jag Balljoint Replacement
I purchased a one-piece lower balljoint and tried to install it in my E-Type vertical link. The hole was too small and the rubber boot was damaged. Did I get the wrong part? —Tom Southland
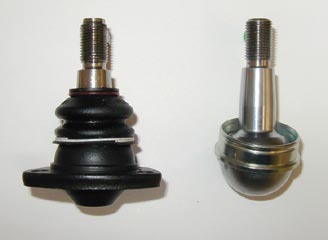
Jaguar designed one-piece balljoints for the 1988 XJ6, and the lower one can replace the original multi-piece balljoint used on the XJ and E-Type Jaguars. The original design uses a steel socket, which is pressed into the bottom of the stub axle carrier (vertical link). When renewing with a multi-piece original balljoint, the socket should be replaced, but often as a short-cut the socket is left in place and only the ball and lower socket are replaced and shimmed. If installing the updated balljoint, the pressed-in socket MUST be removed from the vertical link.
From the factory XJS workshop manual: “Tap the socket out of the stub axle carrier.” This can be difficult, but a frozen socket can usually be freed by carefully cutting partially through the socket wall with a saw or rotary tool cut-off wheel. Once the socket is removed, the new balljoint can be carefully fed through the hole in the stub axle carrier, taking care not to damage the boot. Once installed, future replacements are much easier, with no need to set shims. Since the new balljoint flange is thinner than the original ball’s pin cap, shorter bolts are recommended when installing the balljoint to prevent damaging the sealing boot. Eight 5/16” x 3/4” NF 24 bolts of minimum Grade 5 will do the trick.

Later XJ6 balljoint (left) compared to earlier socket-style joint.
Brighter Bulbs
I’m interested in converting my headlamps to halogens as the originals are pretty dim. Can the wiring in my British car handle these lamps? —Tony Gatewood
The current rating is marked on the lamp’s base; this determines whether it’s safe to use with the original vehicle wiring. The OE bulb fitted to many early British sportscars such as the MGTD was rated at 40 watts on low and 50 watts on high—a couple of steps up from having someone walk ahead of the car with a lantern. A popular period option was to upgrade to Lucas Tripod headlamps, which had more powerful 60-watt high beams. Although not enough to burn the fur off a cat at 50 paces, this was a substantial improvement.
Fast-forward to the advent of sealed-beam headlamp units: The standard unit featured a 50-watt low beam and 60-watt high beam. Unfortunately, mass-production and low costs did nothing to improve lens and reflector design, so most of the light from the filament ended up scattered and useless. The advent of the quartz-halogen bulb brought tremendous changes to European headlight technology, and their much brighter light required careful lens and reflector design to maximize visibility and reduce glare. These high-quality replacement headlamps made by Cibie, S.E.V. Marchal, Bosch, Hella, and others were a part of sportscar legend: Their use at Le Mans and Sebring brought bright bulbs to driving enthusiasts’ attention. Unfortunately, lobbying efforts made them illegal to use on public U.S. roads, which gave just a touch more spice to their use by the cognoscenti willing to brave their local highway patrol and pay markedly much higher prices for better visibility. (I was obviously one of the bad boys saving my pennies for a pair of halogens so I could play junior rally driver in the woods at night.)
A typical 7” quartz halogen headlamp assembly uses a 60/55 H4 bulb, which means simply that on low beam the halogen unit draws slightly more current than a regular sealed-beam lamp. But on high beam, they both draw the same current. British wiring being what it is, the high-beam and low-beam circuits have the same current-rated wiring, switches, and terminals, so the low-beam circuit would be safe for up to 60 watts.
Since we’re talking about British car electrics, there’s always a downside: All of the terminals and switch contacts tend to be corroded and dirty. Installing brand spanky new lamps that are drawing the full-rated current may turn these corroded connections into tiny heating units, which melt their surrounding plastic housings and insulation. This is a bad thing. It isn’t due to the halogen headlamps, but rather to the lack of care for the existing wiring. As a matter of normal maintenance, all headlamp connections and switches must be inspected and cleaned—or your beautifully restored machine may turn into a barbecue grill. Pay particular attention to the high/low beam switch, which tends to bear the brunt of load and corrosion due to lack of use. A typical failure occurs when a car is driven around town for years on low beams, then is taken out in the country for an extended high-beam drive. (Concerning “high-output” halogen bulbs, I don’t recommend them—their light output compared to the load and longevity problems make them unsuitable for street use.)
Moss Motors now carries two high-quality brands of quartz-halogen headlights with replaceable bulbs. For the Anglophiles amongst us, the Wipac lamps say “Made in England” on the lens. Moss also offers Hella headlamps, which offer excellent construction and design. For those on a strict budget, we also have a replacement sealed-beam unit with halogen bulb. This gives a greater light output but without the high-quality lens and reflector or replaceable bulb:
Wipac Halogen Headlamp Set #162-725 $94.95
Hella Halogen Headlamp (sold indiv.) #902-997 $37.95
Halogen Sealed Beam Headlamp (sold indiv.) #171-105 $9.99
'Tech Q&A' has no comments
Be the first to comment this post!