


By Tom Morr
Photos By Eric Wilhelm
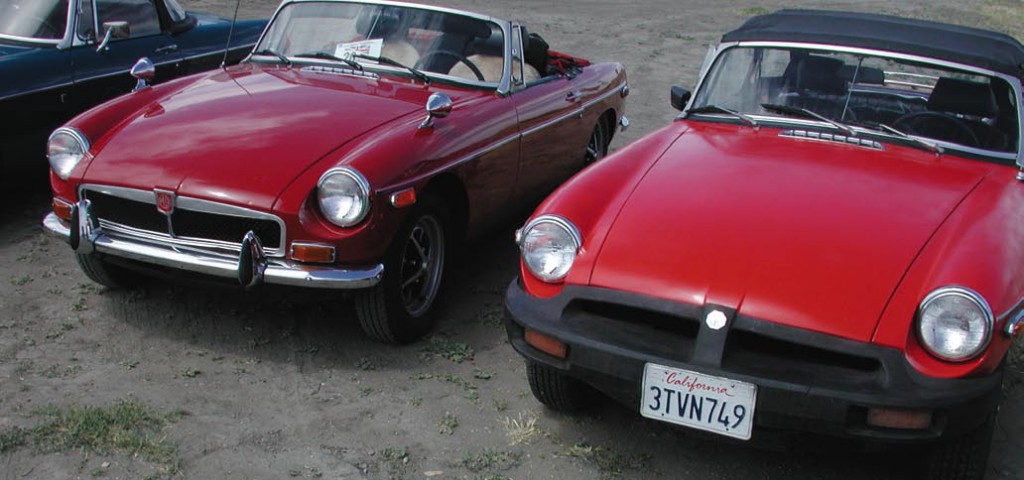
Now rubber-bumpered Bs can go retro thanks to a new chrome-bumper conversion kit.
If you’re lucky enough to own a pristine MGB, keep it that way and watch its value increase. For everyone else who doesn’t have a megabuck auction car or 90-point show-stopper, any modifications that enhance the driving experience and overall fun factor should be considered fair game. Moss Motors’ new MGB Chrome Bumper Conversion (Part # 453-878, 453-888) is one such upgrade, giving owners of 1974.–1980 rubber-bumpered MGBs the opportunity to increase their cars’ class and elegance factors.
This kit is designed with the do-it-yourselfer in mind. However, the job requires cutting, welding, and painting, so Moss Motors recommends professional installation for best results. Having a service manual on hand also helps— these photos were shot on two different ’79 MGBs; exact hardware locations and quantities may vary on earlier cars. This is merely an overview of the major steps of the bumper conversion. Please visit www.mossmotors.com to see the complete instructions.
1. Moss Motors’ bumper conversion kit includes reproduction bumpers, overriders, mounting brackets, and metal fill plates to make the conversion look factory-original.
2. Disconnect and label the front blinker/running light wires near the radiator.
3. Unbolt the front bumper from the corner braces.
4. Mark the grille’s position on the framerails, then remove the grille to access the main bumper mounting bolts.
5. Remove the lower mounting nuts, then the uppers. Note any shims between the bumper and car. The bumper removes by pulling it forward; an assistant is helpful here. Guide the wires as the bumper is removed.
6. Fit and weld the kit’s turn-signal filler pieces onto the car.
7. Use the templates in the kit’s instructions to mark cut-outs for the chrome-bumper turn signals.
8. Remove the old valance; the kit includes a replacement.
9. Trim the main bumper mounts from the framerail using a reciprocating saw for the horizontal cut, a die grinder with cut-off wheel for the vertical slices, and a cold chisel to break the piece loose. Weld in the kit’s sheetmetal caps to fill the rail.
10. The new valance must be notched for the bumper mounting pads with a die grinder or tin snips. Mark it using the instruction’s templates.
11. Install the valance, drilling holes as necessary.
12. Bend and trim the valance’s flanges as necessary to align with the fenders. This requires removing the valance.
13. Install the kit’s bumper brackets and overriders.
14. Install the bumper on the brackets, adjusting it for proper alignment with the body per the instructions, using the factory shims if necessary.
15. Install the kit’s corner brackets between the bumper and valance; mark and drill holes. Then the overriders can be attached to the bumper.
16. Narrow the grille and shape the hood if necessary to fit the new bumper. Set the grille in place and fasten through the bottom holes.
17. Install the kit’s three upper grille-mounting brackets.
18. Align the brackets with the grille surround, attach fasteners, and snug down. Then remove the bumper, brackets, and grille to perform any necessary bodywork and to paint the valance body color
Rear Bumper
19. Remove the rear bumper by unbolting the fasteners in the trunk and under the car and pulling the bumper straight out. An assistant is helpful here.
20. Assemble the new bumper by attaching the brackets and overriders.
21. Use existing holes to attach the kit’s adapter brackets to the body.
22. Attach and align the new rear bumper.
23. Fit the corner panels to each side, remove the taillights and bumper, and weld the panels to the car. (Be cautious when welding near the gas tank.)
24. Reinstall and align the bumper. Then install the bumper filler plates, marking and drilling holes per the instructions. Remove the bumper and brackets and paint the patch panels to match the car.
25. After painting, reinstall the bumpers. Add the front blinkers and reconnect the wires. Here’s a side-by-side comparison of chrome versus rubbber bumpered cars.


'MGB Chrome Bumper Conversion' have 5 comments
March 20, 2022 @ 2:56 am Owen Green
Some photo’s or sketches with precise measurements would be useful. i.e.
item 6. Fit and weld the kit’s turn-signal filler pieces onto the car.
……….oh I’ll just I’ll just fit those onto door panel will that be ok????
September 26, 2022 @ 2:27 am owen green
Instructions insufficient. “20. Assemble the new bumper by attaching the brackets and overriders.” Easier said than done. There is no indication of which bolts to use nor where the rubber spacers or those little bits for compensation of the inside curvature of the bumper bolts are fitted. Plus none of the supplied bolts fitted the overriders.
I am still trying to figure it out…..
March 16, 2023 @ 9:15 am mike
i want to convert my 1979 mgb rubber bumpers to chrome but dont have know how to do it myself with the kit mentioned here can a specialist do it for me please
August 5, 2025 @ 2:25 pm Thomas Conway
My car has already been converted to chrome bumpers. My grill is damaged and needs replaced. Do you sell the grill separately?
August 6, 2025 @ 3:07 pm Chloe Gabriana
Hi,
We do sell grills for the MGB, you can find them easily on our website or you can give us a call to place an order over the phone.