


By Larry Dubois
For as long as I can remember, I’ve always liked the MG Midgets and hoped to someday to be a proud owner of one. In 2012, that someday became a reality when my neighbor decided to sell his 1971 MG Midget.
He started a restoration on it about four years earlier and never finished. When he purchased the Midget in 2005, he drove it home, installed a new exhaust system, then removed the carpet, dashboard and seats. Over the next four years his interests turned toward horses, speedboats and Harley Davidson motorcycles, so he found it hard to find time to work on the Midget.
Therefore, in 2012, he decided that it was time to sell the Midget and free up some workspace in his garage for his other endeavors. That was when the Midget became a member of our family.

Because of the partially disassembled state of the car, we had to push the Midget into our garage. Once the Midget was ours, I enthusiastically went gung-ho dismantling the little guy. I spent many late nights removing and assessing each part to figure out what parts I needed to replace and what parts were available at Moss Motors. Having never restored a Midget before, I was pleasantly surprised to learn that everything I needed to restore our Midget was available at Moss Motors. This being my first attempt at a restoration, I found myself taking a lot of digital photos as I disassembled, packaged and labeling every part along the way.
I quickly learned for myself what I’m sure anyone who has ever restored a car already knew: that once a project car has been disassembled, storage and workspace in the garage becomes harder and harder to find.

When the work on our Midget project slowed, I found myself frequently needing more workspace for other projects that I needed to complete. I continuously had to work my way around the Midget’s body/chassis, which was now resting on jack stands in the middle of the garage.
Frustrated with the situation, I decided that I needed to find a way to create more workspace in the garage without having to store the Midget body/chassis outside in the harsh Southern California elements. (Just kidding about the harsh elements, we are blessed with sunshine most of the time.)
My first thought was that the Midget’s body/chassis was so light; why not just make handles that protrude out from each wheel well? That way, with the help of three friends or family members, we could just pick up the Midget’s body/chassis and carry it to another location when I need the workspace.
I purchased two six-foot-long 3/4” galvanized steel water pipes that were threaded on the ends. I inserted one of the pipes into a front wheel well and noticed that there was a clear path through the engine compartment allowing the pipe to be lined up directly between two of the front shock mount holes on both sides of the chassis. I then fabricated two metal tabs, with holes that matched the shock mount holes, and welded them onto the pipe. I aligned them so that the holes matched the two shock mount holes on each side of the chassis. Using the holes in the tabs, I bolted the pipe to the chassis, which created a handle that protruded about 12 inches out from both front wheel wells.


For handles on the rear of the Midget, I used the mounting holes for the two rubber limiting straps that are positioned above where the rear differential sits. I welded the female halves of two galvanized steel fence hinges to the second water pipe, then used them to secure that pipe to the existing holes on the chassis. The rear pipe/handles swung freely in the wheel wells until they were lifted up to carry the Midget body/chassis. When the pipe/handles were lifted up, they made contact with the reinforced tabs on the chassis just behind the mounting holes.

This worked great for a while, until I found myself waiting around for others to help me lift and move the Midget body/chassis when I needed room to work. So, phase two of the plan. Actually, there was no plan; I found myself making this thing up as I went along.
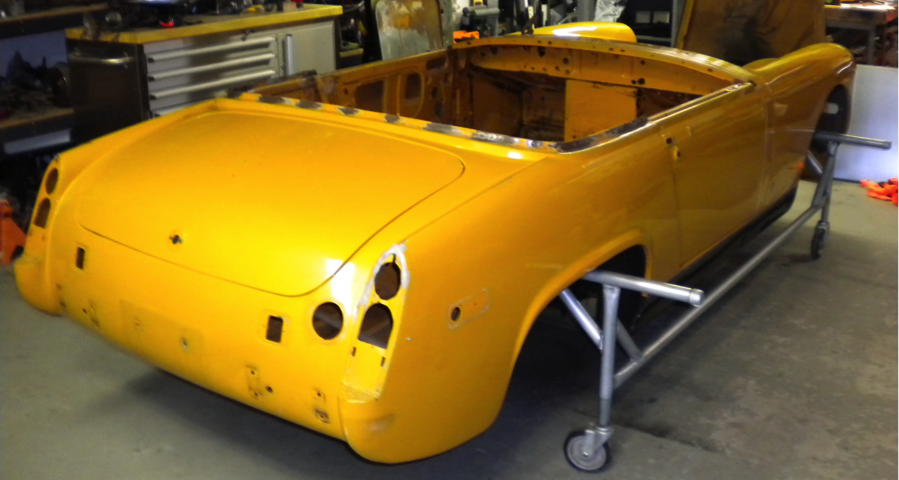
At first I just removed the jack stands and simply lowered the Midget’s body/chassis down onto two piano dollies. This gave me the ability to roll the Midget’s body/chassis outside when I needed more space. The ultimate goal here was to make it easy to move the Midget body/chassis out of the garage, preferably without having to ask friends or family members to break away from whatever they were doing to come and help. The piano dollies worked for a while; however, the dollies were not secured to the body/chassis, so they would occasionally slide out of position. Also, the project was now sitting about four inches off the ground, making it impossible to work on the underside.
Needing a solution to this latest inconvenience, I searched my garage, and found that I had four caster type wheels, which were originally used for a rolling scaffolding unit. I also found some extra 1 3/8” galvanized steel chain link fence top rail tubing stacked in the corner. I found that the fence tubing fit nicely over the water pipes/handles that I had already attached to the chassis. So, I cut four lengths of the tubing, one for each wheel well, and slid them over the handles. I left enough of the threaded ends of the water pipes exposed to allow for a metal end cap to be screwed onto the water pipe, thus keeping the fence tubes from sliding off of the water pipes.
I then welded a vertical tube onto the underside of each of the tubes that I had slid over the pipe/handles. At the bottom of each of these vertical tubes, I welded one of the casters to each tube. I then welded a lateral support tube that connected the front vertical tube to the rear vertical tube on each side of the Midget’s body/chassis. I welded a 45-degree angled support between the handle tubing and the vertical tubing. Another 45-degree angled support was welded between the vertical tubing and the horizontal tube connecting the front to the rear. I removed the jack stands and found I was able to effortlessly maneuver the Midget body/chassis anywhere I needed. Actually, it was almost as easy as maneuvering one of those shopping carts that is equipped with casters on all four wheels, only heavier.

So there she sat, safe and secure for the last 12 months as I rebuilt the engine and rear axle. The ability to roll the bulk of this project outside whenever room was needed to work on other projects was priceless. When I was finished rebuilding the engine and rear axle, and I was ready to put some time into the Midget’s body/chassis, I figured it would be best to start at the bottom and work my way up.

This got me wondering how I was going to access the undercarriage to remove the last 45 years of road dirt and grime. I remembered seeing pictures of other people’s projects where they had mounted the body/chassis to rotisseries that allowed them to have access the undercarriage.
Looking at my dolly, I began to wonder if it could double as a rotisserie. After double-checking my amateur attempts at welding, to make sure none of the welds had cracked, and evaluating the angles of the pipes and tubes, I decided to see if the dolly could possibly double as a rotisserie.
I used a floor jack to lift one side of the dolly off the ground. Meanwhile, the other side of the dolly was still resting on that side’s casters. Once one side of the Midget’s body/chassis was lifted to about a 25 degree angle, I found it very easy for one person to slowly and carefully lift the body/chassis the rest of the way up by hand until it came to rest on the two end caps and casters on one side of the dolly. This left the Midget’s body/chassis balanced at about a 75 degree angle, allowing ample access to the undercarriage.
As a safety precaution, I used two tie straps to secure the two raised handles of the dolly to the overhead beams of my shop.

In this raised position I found it very easy to scrape the gunk from under the Midget’s body/chassis and apply a fresh undercoat. Even with some pretty vigorous scraping and scrubbing, I never felt like the Midget’s body/chassis was going to fall on me. I left the project in this position for a week while completing the work on the undercarriage.
When I was finished working on the underside of the Midget’s body/chassis, it was time to return the project back down to all four casters. Lowering the dolly and the Midget’s body/chassis back down onto all four casters was a little sketchier than the lift, but it could be done with a little help. I disconnected the tie straps and, with my wife’s help, we each held onto the lateral support tube on the raised side of the dolly and found that we were able to lower the Midget’s body/chassis to the ground without dropping it. It was kind of like setting down a barbell.
With the undercarriage complete, the final assignment for the dolly will be for rolling the Midget’s body/chassis onto my flatbed trailer for a trip to the paint shop then back home for reassembly.
When the Midget is ready for reassembly, I will merely need to place the Midget’s body/chassis back onto jack stands, remove the four screwed on end caps and slide the two sides of the dolly off of the pipe handles. Then it’s just a matter of unbolting the pipe handles and I’m ready for reassembly.

'The Amazing Rolling Midget' has no comments
Be the first to comment this post!