


Many British car owners focus on their cars’ paint and chrome, but what about the seats? Every minute of drive time involves sitting on those seats—shouldn’t they be the best they can be?
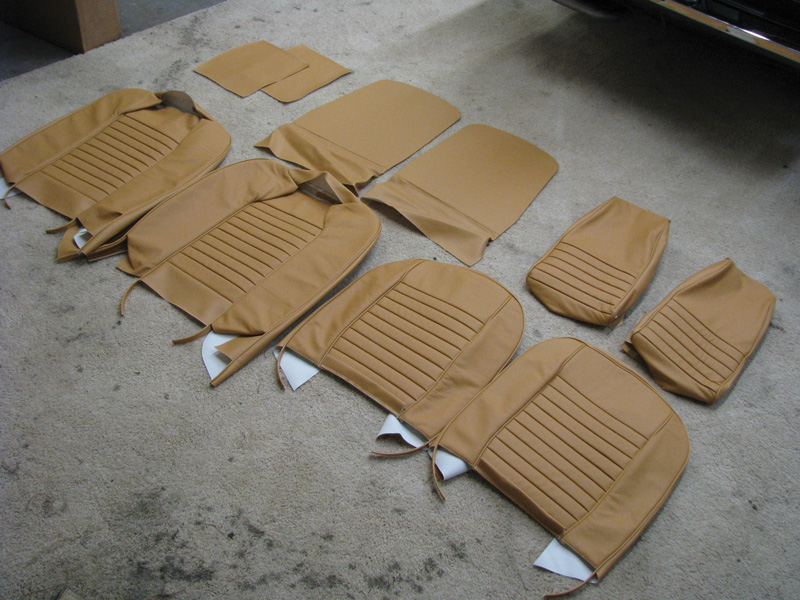
Moss makes replacement seat covers with exact materials, as well as upgraded leather kits. As part of an overall restoration project, leather seats add little extra to the expense, but add far more in terms of sharp looks, a timeless smell, immense comfort and great satisfaction. New leather seats which you get to protect factory seats can make you the envy of the whole gang at your next club event.
When it’s time to address your seats, make sure to get new seat padding, plus new diaphragms to hold up the seat bottoms. You might also need a strap and clip set to support the seat backs.
Our project car is a 1969 Triumph TR6. We decided to replace the ill-fitting, worn-out, black vinyl seat covers with Honey Tan leather to add comfort and style. In warm climates, black vinyl isn’t the best choice for seating materials. Lighter colors don’t get as hot, and besides, nothing looks cooler than tan leather with Laurel Green (essentially British Racing Green) paint.
By Tim Suddard

1. You can tell the foam underneath our TR6 seat has disintegrated since the seat cover no longer fits on the seat correctly. While this seat might not look that bad, the comfort factor in saggy, old seats doesn’t compare to restored seats.

2. Ah, the look and smell of new leather seat covers. While the cost seems pricey, real leather only adds about $500 more to the price of vinyl TR6 seat covers. And they’ll last a long time.

3. Start by taking your old seat apart. The back comes off first and then (on a ‘69 TR6) the headrest comes off with four screws.

4. Flip the seat over, and knock off the clips that hold the seat bottom and back covers in place.

5. Remove the seat cushion material, straps and the cardboard piece behind the headrest. Once down to a bare frame, clean it with a bead blast cabinet; a wire brush and elbow grease also does the job. Then give the frame a fresh coat of paint.

6. Begin reassembly by reinstalling the bottom seat cushion diaphragm, followed by the seat back straps and the foam skirt around the seat bottom.

7. Brush glue onto the diaphragm to hold the bottom cushion in place. Use brush-on contact cement available at hardware, upholstery supply and building supply stores. Don’t use spray glue; we found it doesn’t hold up due to the heat and moisture inside a car.

8. With the bottom seat cushion in place, reattach the original seat hardware. The TR6 seat has springs that clip from side to side. Test the fit of the bottom seat upholstery.

9. Tape the edges of the seat cover out of the way and glue the attachment cloth pieces to the seat cushion. Make sure the seat cover is centered correctly. Then put more glue over the attachment pieces to add more foam around the seat cushion. Remember to always glue both sides and wait a few minutes for the glue to dry.

10. Once the rest of the seat foam is glued in place, un-tape the seat cover and wrap it down and around the seat cushion. Reinstall the clips that hold the seat bottom cover in place.

11. Massage the seat bottom to smooth it out and remove all the wrinkles.

12. Next up is the seat back. First, recover the area behind the headrest. If you have a 1969 TR6, reinstall the headrest latch. From there, follow roughly the same procedure as for the seat bottom, gluing on the seat back cushion and then attaching the seat cover with clips on the back of the seat.

13. When finished, the seat should look something like this. You will not believe how soft, supportive and comfortable your newly recovered leather seats are.
Parts Needed:
642-852 – Honey Tan Seat Kit, 1969 TR6
643-978 – Seat Foam Kit (for both seats)
281-838 – Diaphragm, seat cushion, with mounting hooks (1 per seat)
681-138 – Strap and Clip Set (1 per seat)
'Well Dressed: Treat Your Car—and Yourself—to Leather Seats' has no comments
Be the first to comment this post!