


Prior to the much anticipated millennium, this my 15-year chronicle started to unfurl. It began innocently enough with a brisk drive here in North Idaho at an excursion with Northwest British Classics. The next day, I heard a knocking sound emanating from under the bonnet of my 1971 Triumph TR6 when I first fired it up. It was a warning sound that clattered quite specifically and was audible over the hissing of the dual Weber carburetors and the grumble of the Monza exhaust. It was obvious and inevitable that an engine overhaul was in the near future, and plan A was envisioned.
I piled a stack of parts vendors catalogs next to my easy chair for a bit of pleasurable and, this time, necessary browsing. I started out with an old favorite, Moss Restoration Parts and Accessories for Triumph. It just so happened that I had the latest free want ads, the Nickel’s Worth, next to my stack of catalogs. Like serendipity, a 1969 TR6 with a newly rebuilt engine block—an unfinished project car—was offered for sale locally.
Immediately, a new plan formulated in my brain. After making sure all paperwork resembled the claim of a rebuild, I made a very lowball offer. Surprisingly, my price was accepted, and another lump of British iron materialized in my driveway—and plan B was underway.

The transplant proceeded in earnest as the ailing engine came out along with its transmission. While I had the transmission on the bench, I replaced the syncros and a scoured layshaft along with a first gear cluster that had a gnarly tooth. I speculated that a clutch job was in order, which was easily accomplished out of the car. New bearings and a new clutch release shaft completed the rebuild. The original Girling master cylinder and slave were refurbished and retained. I rebuilt the third member to get rid of a slight whine by replacing a worn ring and pinion gear set.
While sprucing up the engine compartment, and repairing some acid damage at the factory battery location on the firewall, my engineer’s mind began to churn a little. I had a vision of removing nearly 30 years of oil-leak-encouraged road grime in preparation for freshening things up with a coat of Por-15 chassis paint—and that spark of a brainwave became plan C.
Through the years, the essence of plan C consisted of numerous modifications and upgrades, as one alteration lent itself to yet another better idea. A thoughtful declaration was made to follow through with my convoluted renovation and reinvention plan to its completion (in for a penny, in for a pound, as the Brits would say).

In order to understand the dynamic energy behind this project, I need to explain why I would tear apart a perfectly good TR6. It was my therapy, plain and simple. Diversion therapy. I had just passed through four life-shifting events. A 30-plus year relationship and marriage had ended in a vindictive, devastating, and costly divorce. A minor heart attack evolved into quadruple bypass surgery and the parting words from my surgeon, “You have a heart the size and appearance of an overripe grapefruit. Good luck.” Back at work, people were being let go as a reduction in force swept through my company and the communication industry I worked at for 30 years of my life.
I weighed my options and decided to retire; I was 54 years old at the time. There I was no marriage, no promising health prognosis, and no job. What could get worse? Along the way, a couple of national recessions and the stock market taking a few nose dives coupled with an inept financial adviser, and I was pretty much insolvent, thus adding insult to my already private injustice.
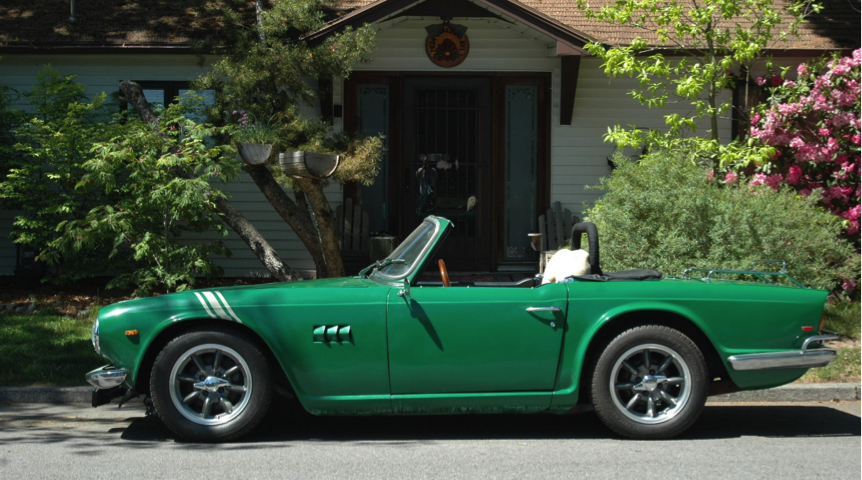
Out in the garage, year after year, plan C was slowly happening as I removed the bulky turn signal lamps and had a more pleasing arrangement built into the grill work. Additional cool air vents were installed in the lower valance along with exhaust vents fabricated in both fenders to relieve under bonnet temperatures. In the engine compartment, I built a fan shroud to house the thermostatically controlled auxiliary fan. Both factory wiring harnesses were discarded and the battery relocated to the boot. Gone is the old Lucas alternator, replaced by a higher output Delco unit. A fuel pressure regulator was installed, along with new fuel lines routed to the boot where a 10-gallon cell, an electric pump, and an inline cartridge filter system were implemented.
The existing brake lines were replaced with an upgraded kit and the brake master cylinders converted to a duel Tilton system with an inline proportioning valve but minus the old salvo assist booster reservoir. New slave cylinders on all four wheels with new shoes added. Lastly, a set of finned aluminum drums off of a Datson 240Z were added to complete the job. I rebuilt the rear lever shocks and installed new Spax units up front. The “Six” started life as a wire wheel car, which I converted to lugnuts, because a previous owner had used Loctite on the splines to overcome damage caused by loose wheel knockoffs! Panasports were mounted as replacements, and I added new adjustable swaybars front and rear. The ball joints were replaced and attention given to the steering rack and column.

A tinted windscreen was installed, with the gutting of the interior coming next. A wood fascia was designed around a set of Autometer gauges, eliminating the glove box. My plan was a dedicated roadster, and for assumed security reasons I opted for no visible storage. I do have an early dealer optioned hardtop as an alternative to no weather protection, and I can always reinstall the rag top as another choice. A switch panel gear shift console was fabricated and a wood rimmed MOMO steering wheel adapted to replace the stock TR unit. A floor-mounted Lokar throttle cable replaced the swing arm stock arrangement. A roll bar, new carpets, three point safety harnesses, dash and trim pieces, plus an interior re-upholstery kit completed the driver’s compartment. As a side note, the interior kit I ordered was out of England, since no stateside vendor had the color I wanted at the time. This kit was to be a major headache, as it just “barely” fit. Some of the pieces were misshaped and drastically undersized—possibly having to do with sitting for over a decade!
With the stock gas tank gone, I built a divider out of sheet aluminum with a swing down door to mount a Painless 18 circuit fuse panel and allow access to it from inside the car when the rear trim section was removed. I mounted the battery in the space behind the fuel cell and retrofitted a windscreen washer reservoir and pump from a Toyota Celica in the space vacated by the discarded evaporation canister. Next I took an emergency spare tire from a Saab 900, as the bolt pattern is the same as the TR’s, and fashioned an upright storage well next to the fuel cell. Pneumatic assist was added to help lift the trunk lid.

The body was completely stripped of five layers of paint, and thankfully, the few normal rust spots associated with Triumphs were minor and easily cut out and replaced. The factory federalized tail lights were discarded in favor of three oval units from a Rover Defender, and LED marker lights added on all four corners. I came upon this arrangement after studying 1950s and ‘60s Giovanni Micheloni’s designs and those of coach builder Karmann Ghia. The result is a cleaner attitude that fits the overall approach I was hoping for with the personalization of my TR6. A single header muffler/silencer and some pipework, and it now dumps a pleasant rumble beneath the “Six”.
Painting the car was an exercise in patience, and telling myself this is the fun part. Primer was shot, then sanded, and the body prepped. A good first coat of what my daughters call “Margaret Thatcher Green” and all was well, until my spray gun malfunctioned internally. In the middle of fixing the problem, the temperature in my garage went up drastically and time got away from me. As a result, the hardener catalyzed paint refused to flow out properly as a second coat was applied, and I had a mess. Not my first paint job, but still, inexperience raised its ugly head. Months later, I was still sanding and prepping for another go ‘round.

A year later, and it was a great early fall morning. The weather was stable and I had a new gravity-fed HVLP spray gun which I practiced with until I assured myself that I was ready. It was a great job, and I patted myself on the back. During the next month and a half, after numerous calls and emails to the paint manufacturer, I made the decision to shoot a quick coat of clear for a deeper shine, following their directions to a T. On goes the clear, and immediately, in numerous areas, I got separation and crazing. Added to this shock was the biggest aphid hatch in years, the air a choking cloud with billions of winged creatures suddenly materializing through the gaps in my garage/spray booth and attaching themselves to the already ruined paint job. I repeated the mantra of “paint on, paint off,” and six months later (thank goodness the third time is a charm!), now minus the clear coat but still with a few suicidal aphids and some orange peel, the job is done. Good enough for me!
 Over the past 15 years, the TR6 has languished off and on in the back of the garage as new projects and love affairs have occupied my time and finances. There was a sweet Mercedes 190E 2.3 with a five-speed manual transmission that went like the dickens but burned copious amounts of oil. The Jaguar XJ that beguiled me and left me stranded one too many times as the tow truck drivers began to call me by my first name. The 1969 TR6 was traded for a TR3 project that was later sold to offset a cash flow problem. I acquired an older Range Rover and allocated garage space to an orphaned TR250 project car with its factory Surrey top that is still awaiting attention. A 1970 MGB GT caught my eye and became another and different therapy-induced project and a whole other story. The TR6 is now done, and I am satisfied, even if it was a long time coming!
—Don Schmidt

'A Long Time Coming' has 1 comment
July 29, 2015 @ 1:15 pm Bob Tlapa
Curious about the paint problem. What type and brand of paint did you use? I did my first two-part poly job on my TR6 back in the early ’80’s, 34 years ago and it was the best one yet and I used multiple coats of clear. However, I didn’t wait weeks to do that clear top coat. You treat clear just like any other coat of color paint as far waiting between coats. There is a time limit in which to do that and it’s not a month later. More like flash off time but no longer than 24 hours. Waiting any longer will cause the paint to lift and craze.
A few days after my paint job was done, I decided that it wasn’t as perfect as I wanted. To me, it looked like a repaint to me but I’ve been doing this since I was a teenager and I can walk up to most any car and tell if it’s been repainted or repaired. So, I decided to experiment with some 1000 grit paper I found lying around. My wife walked into the garage, saw me sanding and freaked out…”What are you DOING? Painting it again???” I asked her to go back in the house and I’d call her in about 20 minutes. I grabbed my trusty buffer and with some watered down compound I started in on the top of a fender where I sanded it. WOW. The results were awesome. It looked like a show car or at least like a super good factory job. A day later, I had the entire car with a real deep shine meaning you could see perfect reflections of surrounding objects that were 5 feet away. Just last year at a car show, I mentioned what I did and a professional body shop guy said, “Oh, we all do that now with clear coat using 1200 or 1500 paper.” Hmmm, maybe I pioneered something new.
Good luck on you next paint job.