


by Dick Mason
During the winter months of 2019-2020, I decided that my MG winter project would be installing Moss Motors’ new improved XPAG crankshaft rear lip seal kit into my 1951 MGTD. I installed their original kit a decade ago but that only turned a gusher into an annoying seep.
Okay, parts have arrived, garage is reasonably organized, radio’s on,
I’m ready.
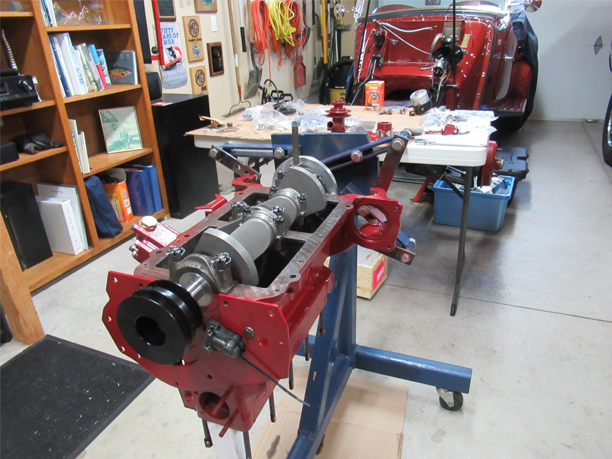
Step one: Dismantle the car forward of the rear axle. Since the seal kit requires removal of the flywheel, which cannot be done on an XPAG engine without first removing the oil sump, it’s much easier in the grand scheme of things to pull the engine and place it on a stand. Although the shop manual shows factory blokes lifting out the transmission from inside the stripped interior, I have found it easier to pull both the engine and transmission as a unit (hint: remove the frame engine control/stabilizer bracket). It takes a bit of twisting and tilting, but it’s do-able. Since the engine sump and flywheel would be off, the plan was to also remove the crankshaft and replace the bearings while I was in there. So far, my project budget was well under a grand.
The gearheads in my British car club, with many restoration projects behind them, unanimously recommended I take the factory original 70-year-old crankshaft to the machine shop for a crack check. Fully aware that XPAG cranks are prone to crack between the rear bearing and the flywheel, I received the dreaded phone call that this crank had indeed rotated its last rpm, with multiple cracks as predicted. There goes the budget.
Once down the rabbit hole, might as well keep on going. There was much rejoicing at Moss Motors upon the receipt of my order for a new XPAG billet crankshaft, pistons, connecting rods, ARP bolts, gaskets, bearings, seals, block plugs and more. The block was “refurbished” at the machine shop, which pronounced it good for another 70 years.
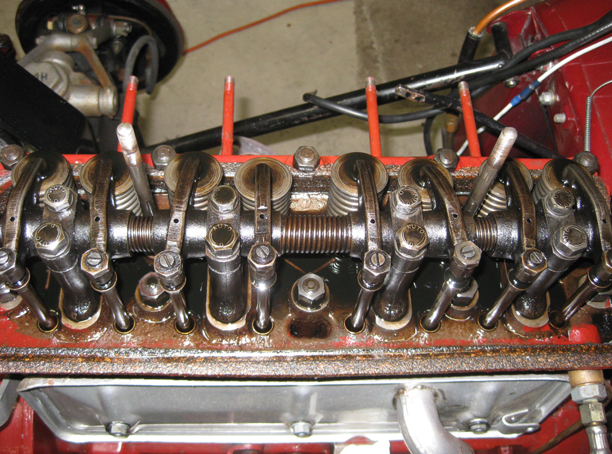
Quality time ensued in the garage re-assembling all those shiny new parts back into the block. The rear seal kit was a straight-forward install, followed by a spiffy new coat of engine paint. The 5-speed transmission “offered up” (as the factory manual puts it), and back into the car it went. A few words on the Moss 5-speed: it’s been worth every penny in drivability improvement in today’s traffic. No issues after 16 years.
Prior to inserting the engine back into the car, I also replaced the oil pump’s pressure relief spring and check ball. Oil pressure had been wonky since my previous engine removal in 2015 for camshaft replacement. While inspecting the oil pump innards back then, I discovered the existence of the block’s oil by-pass fitting. After exercising the fitting’s ball and spring, I failed to note that now-loosened rust and 70 years of crud had blocked the ball from fully reseating, hence my wonky oil pressures—acceptable but not quite right. With a bit of elbow grease, emery cloth, and polishing compound, the by-pass fitting was “renewed,” and everything reseated as designed.
Finally, time to prime the oil system and fire it up. The oil pump had been packed with Vaseline and after a short crank, oil began oozing from the cylinder head rocker arms. No oil pressure on the dash gauge, though. Hmmm. Well, there’s clearly oil circulation, so I fired it up and… no oil pressure. Ah crap. The second opinion of an oil pressure testing gauge confirmed no oil pressure, neither when cranking nor at idle. Something’s wrong with that oil pump.


The left frame rail blocks removal of the external oil pump, but by disconnecting the front engine mount, stabilizer, and steering column, you can jack the engine up two inches and lean it to the right just enough for the pump bolts to clear the frame rail. With the pump back on the work bench, I discovered the block-mounted driven gear shaft was slightly bent from being left on while the block was at the machine shop. Another round of high-fives at Moss Motors when the pump rebuild kit order was placed.
Now I was on a mission to build the perfect XPAG oil pump. Gear and pump housing clearances were honed to precise specifications after a week of polish, Plastigauge, assemble, disassemble, inspect, repeat. Many times. Final clearances were “spot on” as the Brits say. Back on the engine, re-assemble engine mounts and control arm, crank-crank-crank the motor and… still no oil pressure. What is going
on here?
Since the XPAG’s oil plumbing is mostly external, I did a pump volume check by swiveling the pump-filter pipe off the filter to a container. One full cup of oil after five seconds of cranking, so the pump is clearly moving lots of oil.
Having eliminated all other possibilities, I’m down to suspecting the pump’s brand-new ball and spring in the pressure relief valve assembly. When it opens, output oil is dumped back to the inlet side of the pump, so oil just flows in a tight circle. Fortunately, this part is easily accessed from below (albeit quite messy, as oil drips down your arm) so it’s time for the McGyver fix. Off to the hardware store for a skinny 50-cent spring to fit inside the official spring, fired it up and—holy cow—lots of oil pressure! In fact, both gauges were showing 95 psi at 2,000 rpm, 50 psi at idle. Hallelujah! Birds are singing, the sun is shining, all is right with the world.
After the recommended break-in run for the piston rings, it’s starting to get smoky in the garage. In fact, the longer it idled, the smokier it got. Things were looking like the old DDT spraying machines from the 1950s. The exhaust was clear at high rpm and under load, but gradually got oil-smoky as it idled.
The issue was placed before the gearheads at our Friday morning British Cars & Coffee group. Their consensus: worn valve guides. At idle, the engine’s intake manifold vacuum pressure is at its highest, which will suck oil down worn valve guides into the intake manifold and cylinders, creating blue smoke at idle. But I had rebuilt the cylinder head two years prior with upgraded valve guides and there was less than 1,000 miles on the car since then with no previous smoke issues.
Ever have one of those problems that you stew over for days with no resolution, only to wake up in the middle of the night with a “that’s it!” flash of inspiration? Brand new engine innards with tight bearing clearances, an oil pump pushing out oil well beyond factory specs, and all that oil had to go somewhere. I was flooding the cylinder head with oil to the point where the new valve guides were submerged, while those new piston rings were creating serious manifold vacuum pressure at idle!
During initial disassembly, I found the block-cylinder head oil feed line top banjo bolt had a restricted 1/8-inch opening. I substituted a standard oil feed banjo bolt since everyone knows more oil is better, right? After my “Eureka” moment, I reinstalled the restricted flow banjo bolt to the cylinder head fitting, but that didn’t make much difference with the smoke issue. I have no idea if the restricted flow bolt was factory issue or a later dealer fix, but it appears that exhaust smoke from cylinder head flooding was a recognized issue in the past.
The factory specifications for XPAG oil pressure are for a positive reading at idle, with the pressure relief valve modulating maximum pressure to 50-70 psi. Rather than spending oil-soaked hours under the car swapping out oil pump pressure relief springs, I installed the Moss adjustable oil pressure regulator gizmo which allows you to easily adjust the relief spring pre-load. There’s still a bit of idle smoke at 70 psi but clear exhaust at 50 psi at all
engine speeds.
While I’ve got you here, there’s been considerable debate over the years on where the factory hooked up the oil pressure feed line for the dash oil pressure gauge—from the top banjo fitting on the block-to-cylinder head external oil feed line, or to the bottom banjo bolt. The correct answer is “Yes.” Early TDs used the top banjo bolt, later cars from the bottom banjo bolt. Using my oil pressure diagnostic gauge tapped to both locations, I got a 10 psi higher oil pressure reading from the lower banjo bolt location.
Oh, that new crankshaft rear seal that started this whole adventure? Works great!
Maybe I’ll try to fix the clock next. MM


'Under Pressure' has 1 comment
August 3, 2022 @ 12:01 pm Penelope L Huggins
Wonderful clip about oil pressure issues in MG TD. You caught my heart on that article.. It is wonderful to remember all the times I did the same thing “back in the day.” The old British cars are simple enough that the passionate mechanic/driver can delve into the car’s systems and learn a lot, not to mention a practice to improve my mental health. My first NEW car was a brand new MG Midget in 1971 for $2,800.00, (That’s right: Twenty Eight Hundred!) I have loved and cared for more “Brit” roadsters (and sedans: MG Magnette 1958), than I can tally. (I worked full-time on these little cars, Triumph, and Jaguar for the best part of a dozen years.) I am retired now, and my next birthday will be my 70th. I am looking now for a MG TD, (or other “T”). I have the time, the tools, and the skill to put a lot of love into an old survivor, or adopt a restoration, (STRICTLY STOCK). (Two times the purchase of an MG TD fell through at the last minute in the past few years, I hope 3rd time is the charm.) Enjoyed the article! I believe that these cars should stay original and be restored to the way they were when new.) No Replicas with VW engines! God Save the Queen!