


by Russ Van Tine
There is often a problem discovered on many XPAG engines that have been worked on by people who are not familiar with its design. The valve seals get installed incorrectly below the spring washer (instead of above the washer and below the cotters) causing a lot of oil to pass down the valve into the cylinder. In a moment of inspiration, I made a valve spring compressor that allows the valve springs and seals to be worked on or replaced without removing the head.
There are a few valve spring compressors on the market (and I have several) but none of them worked on my 1953 MGTD with shot valve seals. The XPAG engine uses two springs for each valve. Some of the spring compressors available work on some cars with one spring (by grabbing onto the spring and using a dial to compress the spring) but it does not reach the internal spring on an XPAG engine. Other compressors require the head to be removed, and not everyone is comfortable doing that. So I came up with a basic spring compressor that’s very easy to make.
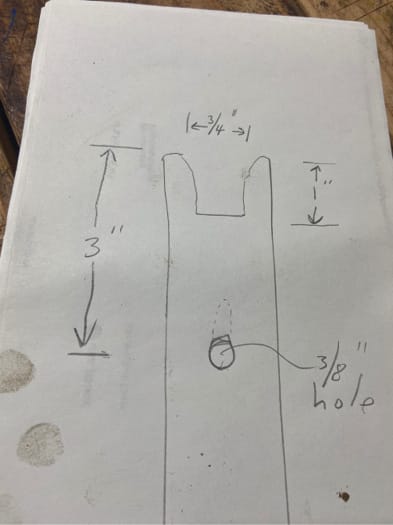
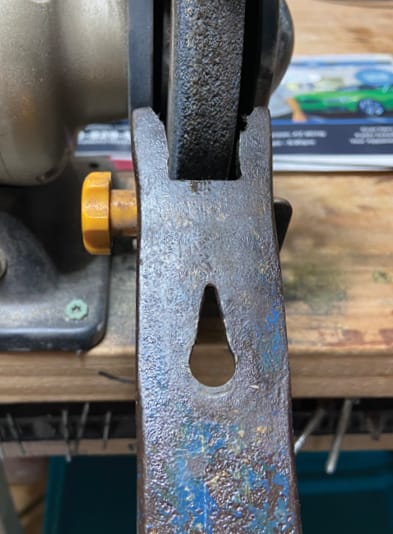
Start with a standard pry-bar you can get at any hardware store. Using a grinder, open up the pry end to make room for the top of the valve (with cotters and seal) to pass through while holding down the spring washer to pass through it. I then drilled a 3/8″ hole enlarging the existing v-shaped nail hole to make room for the rocker bolt to pass through it and screw into the head.
Very simple tool. Easy to make. And it works great!
Of course, each piston should be brought to TDC so that the valve does not fall into the cylinder. To ensure the valve doesn’t fall you can apply air pressure to the cylinder via the spark plug hole, or push some vinyl rope into the spark plug hole so the valve stays in a closed position. Don’t use cotton rope. It can leave lint in the cylinder and it is hard to push in.
Basically, after removing the valve cover and the rocker, each spring can be compressed by passing the larger rocker bolt through the hole in the tool and screwing it into the head where it was removed from. The “ground end” of the tool is placed above the valve and the valve spring washer. Tightening or loosening the rocker bolt comes in handy in order to get the best leverage (and to adjust for any curvature that the pry bar has). Pushing up on the longer end of the tool compresses the springs giving you great leverage to remove the cotters, remove the valve seal, and remove the springs. The tops of two valves can be worked on from each of the positions from the rocker bolt holes. To reassemble, simply reverse the procedure.
I have tried many times to do this with other valve spring compressors but each was a nightmare. I hope this helps someone.
Sometimes unique tasks inspire special doohickeys or custom-made contraptions. We want to hear about the unique tasks, problems, and tool solutions that British car owners are more likely than most to encounter and hurdle with a bit of ingenuity and luck.
Tell us about your oddball and custom-made tools at: MossMotoring.com/oddball-tools


'One-of-a-Kind Tools: DIY Valve Compressor' has 1 comment
August 8, 2024 @ 7:18 pm pasdec
Thanks for sharing! That’s a great idea and I’m pretty sure will work on my MGA too.
Cheers
Phil